The Voyager Project

A few months ago, I made some simple costume versions of the Star Trek: Voyager uniform for Halloween for my oldest daughter and myself.  We also wore them to the Star Wars Fandays convention.  My second oldest wanted a Star Trek uniform as well, but I did not have time to make her one, so she went as a Raven Claw student from Hogwarts.  However, this did give me an idea.  One that would occupy me for many hours over 5 months.  The girls and me in Voyager uniforms for DCC 2013.  If your interested in the details, they can be found at the Starfleet1701st forums.  Suffice it to say, I took great pains to make sure these were a little more than just simple costumes.  I tried to get an accurate fit, shape and color for each.  I even went so far as to hand dye the division colors of the yoke and shoulder caps and have proportionatly sized comm badges made for the girls.

Coloring fabric
All cut and ready to assemble

The project was fun and rewarding, but very challenging.  I had to learn a few new skills and techniques to get the uniforms put together and look right.  I don’t anticipate doing anything quite so grand again.  I want to give special thanks to Andy, Katswell and Sparky from the forum for their help in making this project possible.  Their support made an impossible task possible.

The Girls & Me on the red carpet

The Girls & Me at the USS Joshua Stargate.

Fun with phasers

Who you calling nerd?

Sales and Use Tax for the Little People

I have operated or help operate a few small businesses over the years.  Many people turn a hobby they love into a business or discover there is a need to be met using a skill they have.  Most of the time they want to do the thing they set out to do, organize homes, write, sew products, etc and don’t want to take the time to learn how to “run a business”.  That’s all fine until you are a success and realize that the State would like a little part of what you have been doing.  About this time, the accountant is called and the process or sorting it all out begins.

To help those who are just getting into it, there are a few things you can do to make it a little easier on your accountant at that time.

  1. Keep all your purchases for your business separate.  You don’t need a separate account, though that is best, but you need to keep reciepts to know what went out.
  2. Keep a record of your sales.  This can be anything from handwritten invoices to spreadsheet downloads from sites like Etsy or Paypal.  
  3. Be as detailed as you can.  If you sell widgets and ship them and offer discounts all of that is important information.  Where you are performing the serivce or mailing products is also important since you have to pay taxes to the state where this happens.  The giggler here is that the amount you charge to ship items is also taxable.
  4. If there is even the slightest chance this will be a business, just get a dba (Doing Business As) if you have a separate name and request a tax number from the state.  It is low cost (under$20) and will same you a few headaches in the future if things take off.
  5. File your reports.  The state does not care that you are doing well, just what you are doing that they can tax.  Even if you have no sales, you need to files a Sales and Use tax short form each quarter letting the state know.
  6. If you have employees, you’ll need a federal ID number and you’ll want to get some professional help at that point as there are MANY rules the small proprietor will have trouble knowing about.  There are also lots of fun new forms and taxes to pay.
That’s the short version.  Just make sure if the state comes calling, to be prompt and poilte especially if you have to go to the locale office and talk to someone.  They are just doing their jobs and like most of us will help those who are nice to them.

Moving earth

There is a small area in front of our house that had bushes and some vining ground cover.  Mel has wanted a seating area out there for a while so I did that project this weekend.  The area is bout 3′ X 6′. On day one, I cut the bushes, pulled and replanted the ground cover then moved the roots and about 6 inches of dirt.  Day 2 I started moving and setting stones.  I used the old concrete blocks I had collected for making a back porch.  It took me the better part of the day to set the stones, fill in the dirt then put the left over dirt in the garden and clean up.

Dryer Repair

The dryer stopped heating last week.  Rather than run out and buy a new one, I took the old one apart and found tons of lint, dust and sand.  Even after cleaning though, I still did not have heat.  I pulled the sensors and the heating coil and it all looks like the stuff that came with it originally.  I found the model number and I used www.searspartsdirect.com to identify the part numbers I needed.  The part were way expensive there, but looking on amazon I found some after market parts that would work.  $50 later, I have a functioning dryer.

Bench Project

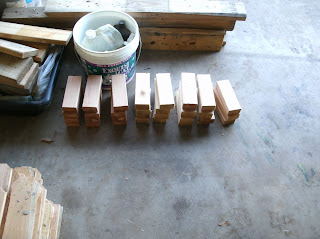
A few months back I recovered some pallet wood from work.  We wanted a picnic bench in the back so I thought this would be a little cheaper than buying wood.  After I got the pallets home, I had to tear them apart, discarding what was too bent to use.  I started with the idea of a bench that had angled legs, but found this at a restaurant:
After months of doing a little at a time, by bench is finished:
Of course, I did have some help in the final assembly:

My Horse Threw a Shoe

Thursday started as any other. Out the door early, I had payroll to finish up, things were looking promising.  I took my oldest to school.  I thought I heard someone honk at me as I was getting on the highway, but could not really tell.  Finally, about halfway to work, someone did get my attention and informed me of the flat tire.

I was right at an exit, so I crossed three lanes of Airport Freeway and found a parking lot.  Sure enough, the rear diver side was completely flat.  I had not even noticed.  I went straight to work getting all the spare items out to get it changed and get back on the road, but I could not locate the special tool for removing the lugs.  I searched the entire car.  Nada.

I got on the phone to call my wife to bring my tool kit that I thought might have it.  She did not pick up her mobile or the house for 20 minutes.  Turns out she was watering the garden and could not hear them.  So by now I am getting later and more mad by the moment.  She finally arrives and the special item is not in the box nor is it in her van.  This thing is gone.  Then I recall getting my tires rotated about two months ago.  They must have misplaced it since I have not had a reason to look at the spare items since then.

We pack up and go to Discount Tire.  As usual, the line is out the door.  I get up to a counter and they are able to get me the item, no charge thankyouverymuch, and we are back on the road to my vehicle.  I get the tire changed in short order and get back on the road, now and hour behind. 

You would think that is the end of it, but halfway again, I get a wobble and noise.  I figure the spare is going flat, pull over and take a look.  Apparently, I have not tightened the lugs completely (palm face smack).  That done, no further issues getting to work.

So kids, what have we learned?  Make sure you have all your spare items, in good working order.  Checking it about once a month or every other just to make sure it is ready when you need it.  Next, no matter how much you trust the people working on your car, check that you got all your items back and the tightened thing properly.  Finally, learn to change a flat and check your own work.  Make sure the replaced tire is snug all the way around.

The Man Cave

There is a small alcove in our garage, about 10X6 that looks like it was designed as a workshop are or laundry room.  At one point I had my workbench there and used it as my work area.  While that was fine, I am in a house filled with females and I needed a place where testosterone was the ruling hormone  Hence the creation of the Man Cave!

Like anything else in life, this project was a whole lot more than just making the decision.  The west and south walls were largely unfinished and there was exactly one outlet in the whole garage.  Also, there is a small breaker box that was added (sloppy) to run 220 for a dryer.  The first steps were to get that silly box turned the right way otherwise it would stick out of the wall and be inaccessible.  From there I ran a new wire all the way to the end of the west wall adding six new outlets.

After that, insulation was added to the walls and then covered with 7/16 plywood.  Why plywood and not sheet rock?  Two reasons, 1) I mostly work alone and moving sheet rock without breaking it requires two people. 2) the plywood will be much tougher and take more abuse which I think is needed in the garage.  An with that, stage one is completed.

The lessons I learned during this phase.  It’s ok to ask your buddy to come over and help lift the very heavy plywood pieces to the top.  Like all other houses ever made, the construction is less that square, multiple fittings and cuttings are required to get the piece to fit.  Next, 2 pm during one of the hottest summers on record might not be the best time to install outlets.  I’m not dumb enough to have connected the power before doing that, but I am dumb enough to not be wearing safety glasses.  Sweaty hands slip and I did a few times drawing quite a bit of blood.  Once was even a slip that put the tip of my needle nose pliers in my eyebrow, missing my eye about 2 inches and leaving a 1/4″ cut.

I am looking forward to stage two where I will get the Cave looking more like an actual room and add some sort of furniture and a/c device.

Closet Project


Returning to the original purpose of the blog, here is a project three years in the making.  Our house was built in 1961 before central A/C became popular.  As such, when they built them, they did not have a dedicated space for the HVAC like contemporary houses do.  When the A/c was put in here, they put it in the master bedroom closet which also happen to be right on an outside wall between houses.  The drawback of course is you loose a closet.  There is a hall closet, probably originally designed for linens, that was modified for holding clothes.  It had one bar along the top and random shelves and hooks.  The shelves left me about 4′ for all my things.  It’s ok, but all my clothes get bunched in so tight I can barely get them in or out.  I simplified as much as I could, but I still needed space.  

When we had the A/C replaced, I asked if it could be moved to the attic so I could reclaim my closet.  Again, unlike the contemporary homes, the attic space is tight, so the A/C was left in the same spot.  I had a similar problem in our last home and I cured it with two stacked hanging bars, one for pants one for tops.  I have spent more time and effort creating organizing “systems”, but for my purpose here, simple was best.  The materials needed were pretty minimal.  I needed two bars since the one that was in there was too short.  They compensated by stacking wood, but that’s ugly and not near as strong.  Next I needed paint to cover up the flat, stained(?) white and places where I took out the old shelf railing.  Finally, a small light so I can see whats in there, one that required no wiring.

2 – 5′ lengths – 1-1/2 in. Pine Round Dowel – @ 2.17/ft
1 – Can clearance paint – $5.00 Behr one-coat eggshell some version of off white.
1 – package Moon Lite – $9.49
4 – 1 X 6 X 27 wood – to hold rails – stock reclaimed from pallets.
1 – Tie and belt rack gift from X-mas
reclaimed rails and shelves

Project Total = $39.17
The whole project took about 4 hours.  

  1. I removed all the contents and placed them on the bed.  
  2. Next, I took out all the rails, shelves and left over nails, making sure not to poke holes in the sheet rock and keep the rails as intact as possible to reuse.  
  3. I patched the holes with plaster compound I already had and did a quick sanding once it dried to get a relatively smooth surface.  
  4. Once that was all done, I put in the pole supports and railing for the shelves.  I placed them at 39″ from the floor and the other pole so there was plenty of space for my longest items.  
  5. When all was in and I was sure it was the right size, I put down some plastic and painted.  The stuff was enamel and in a small space, so the fumes were pretty strong.  Thankfully, I was not in there long.  
  6. I took a nap, went to the park with the family and when I got back made sure t was all dry and started filling.  At once I realized I had not completely accounted for the hanger sliding under the shelf.  Rather than remove everything, I just cut out a notch with a hole cutter.  
  7. Everything was put back and I put the light in.  
  8. When I was happy with that, I added the tie rack in the back and snapped pics of the final project.
Now all my clothes fit, there is a small light that won’t wake up the girls if I turn it on to see what I’m after and the hanging stuff is no longer dangling from the door making noise when I open it.  I plan on doing something with that old nasty floor at one point, but for now I’m done.

My how your garden grows

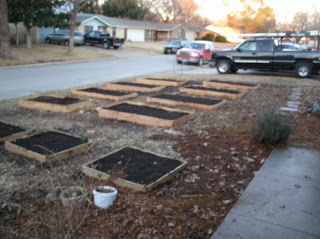
So back to the original intent of the blog which was to show projects you’d see on HGTV, but with all the reality left in.  The project here was making raised garden beds for our front yard garden.  I had suggested this about 2 years ago, but my DW did not want to incur the cost and there was something about the aesthetics she did not like.  After a season of getting run over by grass and weeds, over grown tomato plants that turned into ground creepers and a husband willing to pay the price in dollars and hours we are now doing raised beds.

Materials used:

48 – 1 in. x 4 in. x 6 ft. D.E. cedar fence panel – ($1.49ea)
3 – 2 in. x 3 in. x 8 ft. rough cedar fence rail – ($3.77ea)
2 – boxes Deck Mate #8 x 1-5/8 in. Coarse Wood Screws – ($8.69 ea)
8  cu yds compost ($30 cu yd + $65 ship)
~10 cu yds hardwood mulch – Apparently free

Project total = $431.84 after tax

Step one was to cut 16 of the fence panels in half and then cut the rails into 7″ pieces.  Why 7′?  4″ in wood talk is actually 3.5″.  The width is always 1/2 in thinner.

Step two was to assemble the long sides.  Two long panels and two rail pieces with an added rail in the middle for support.  The planters were stacked two boards tall to give us 7″ beds.

Step three, assemble the boxes by putting your longs rails on the ground, standing on their sides and attaching the short panels to one corner then the other.

Sounds easy right?  Well, the notes to self are as follows:

  1. Don’t pre-drill all your holes.  Sounds like it would same time and it might if you assemble one box all the way and take measurements from that one to pre-drill all the other boards.  I ended up with the holes too close to the edge to sink a screw in the rail, so I had to redrill the holes anyway.
  2. Get two boxes of screws.  I only got one to begin with, but I was putting two screws in each panel where it connected to the rail.  These need to last, so I wanted them tight.  That’s 40 screws a box and that is over a pound.
  3. Assemble all the long sides and add then add the short panels.  It took me a bit of trial and error with getting the boxes together.  I assembled a couple of short sides then tried to put the long sides on on the ground.  The was a lot of back ache and knee pain.  It is easier to assemble the heavier long sides on your bench then set the two sides up on the ground and attach the short pieces.
  4. Hide them from your DW so she cannot start putting them on the ground without your help and hurt her back.  :^)
Now the garden will have 8 raised beds with mulch paths running in between.  This will keep our good soil in one place uncompacted.  I will post further pics as the season goes.
Here are the pics of the finished beds set:

Beds laid out, Mel is putting down the mulch for paths

Mulch in place (what we had) and compost filled beds. 

Started with 8cu yds of compost.  That was…a little too much. 

What was left.  Still finding places in our yard to put it.

Me and Discount Tire

So I bought four new tires in February from Discount Tire off of Beltline and 121 and as I drove off I noticed there was a slight wiggle in the wheel. I thought it was just the feeling of new tread that needed to get worked out. A couple months later I find the time to go back since it was time for a rotation and the wobble had gotten worse. I told them about it, they said they were fine so I drove off. The problem persisted so I made it back in June determined to get this fixed. The charged me for a “road force balance” and sent me on my way. I went a few miles down the highway. turned around and came back, still not fixed. The looked again and told me a “control arm bushing” had worn out ant the horizontal movement might be causing the problem. I had that fixed, but, you guessed it, no better. In all my time buying tires from DT, I had never had a problem and I have bought many plus a few set of wheels. So I had looked for any other problem feeling they just could not be that incompetent.
So I had enough. I took the time to get me car down to my Uncle (Bill Shores of Bill Shores Automotive, convieniently located in downtown Fort Worth.) He went over it and noticed, just by sighting the tire, that not one or two, but three were out of round! So, I took my car back again (all to the same location on Beltline). I told them I wanted all new tires and for the trouble they had caused me, I would like them to upgrade the tires. I was informed that they would happily replace the tires (I had bought the warranty so they had to anyway) but to up grade would cost me. Was I asking too much for the trouble I asked? No, but they could only discount the upgrade, not give it to me.
So I took my tires and left and then wrote a gently worded letter to the regional and home office. I received a call from the region and worked out a deal to keep me a customer. I went to the location on Harwood and was treated really well. I can still recommend the company, but I would avoid the location in Irving on Beltline and 121. They don’t seem to care much if your are happy even if you have working tires. I know the one on Camp Bowie was always great.